


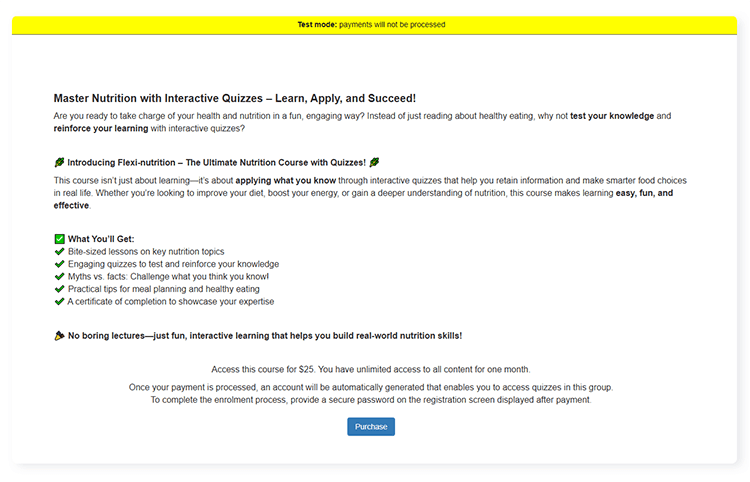
Make a landing page to sell your group of quizzes
You can create a custom landing page that promotes the course or group of quizzes you want to sell with a seamless user experience.
The page can include various content, such as a product description, benefits, pricing options, and terms of use.
In addition, the page includes a call-to-action button that connects to our payment processor, Stripe. Once your users complete payment, they can set up their FlexiQuiz Respondent portal to access your course content.
How to create a course
- Start by making the content your want to sell – this can include training manuals, quizzes, assessments or exams.
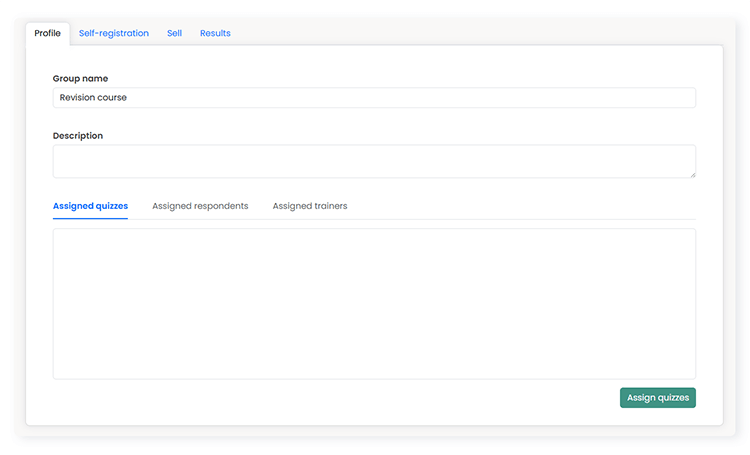
- Then, create a group by clicking Groups on the top menu to open your groups dashboard.
- To create a new group, click +New group. Your group profile page will open.
- Now, enter a name for your group.
- Scroll down the page to Assigned quizzes and click Assign quizzes.
- Click on each quiz you want to add to the group and click Assign selected quizzes. A list of all quizzes in the group will appear in the Assigned quizzes box.
How to set up the landing page
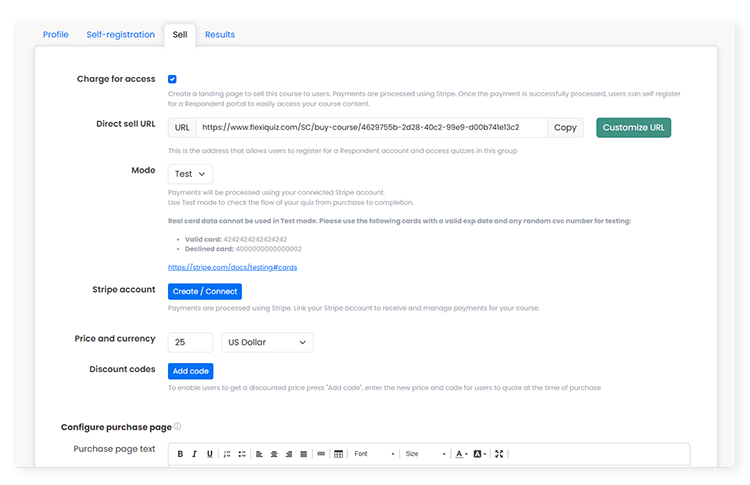
- From your group's profile page, click on the Sell tab.
- Now tick the box Charge for access. The options to customize and share your page will appear. The page is currently in test mode and you can try the whole customer journey using a test card. If any users land on your page we cannot process their payment. To process payments, you must change the mode to Live.
- Scroll down the page to the Stripe account and click Create / Connect. Then, follow the instructions to link your Stripe account.
- Next to Price and currency, enter the amount you want to charge for the course and the currency you will accept.
- To allow discount codes, go to Discount codes and click Add code. Then, enter the discount price and the code your customers need to quote to get the lower price.
- Then go to the Configure purchase page section and enter the text you want to appear on the page. You can also change the size and color, add a link to another website, and adjust the position of the font.
- Now, go to the purchase button text and add the call-to-action. Your customers will click this button when they are ready to buy your course and the Stripe payment page appears.
This image shows an example of a landing page to sell a course.
How to customize the registration pop-up
Once your customers successfully complete payment through Stripe, a registration page will pop up, allowing users to finish setting up their Respondent portal.
You can customize the text on this registration page and send a welcome email to your new customers.
- Go to the Registration screen text box. Enter the instructions for your users.
- If you want users to provide their names, tick the box Show first and last name. You can customize the label for the first and last name boxes.
- Next, select whether you want to customize the labels for the following boxes: email addresses, usernames, passwords, and the text of the register button.
- To send a welcome message to your new customers, tick the box Send welcome email.
Share your course
Once you are ready to share and sell your course content:
- Go to mode and change from Test to Live.
- Then share your Direct sell URL
When someone buys your course, they will appear on your users dashboard.
Frequently asked questions
Can I schedule how long users can access the course content?
With FlexiQuiz, you can set a schedule from when the learner enrolls in your course.
This guide gives you more information about setting the schedule.
Can I set a drip schedule?
It is possible to drip-schedule the content based on the calendar date—the quizzes will automatically open and close on set dates. Learn more about scheduling when a quiz opens and closes.
Relevant help guides:
Customizing Respondent portals
Types of quizzes and tests you can build with FlexiQuiz
Blogs:
A beginner's guide on how to make money selling quizzes
Back